How to Test a WordPress Site on a New Host Before Changing DNS?
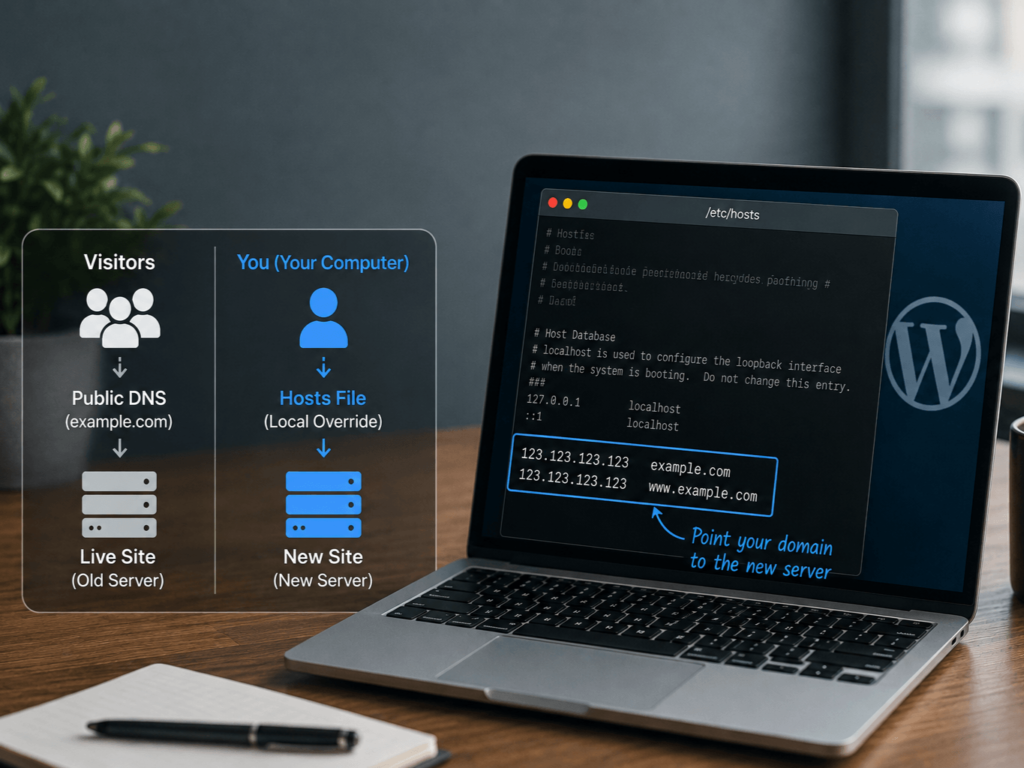
Want to test a WordPress site before changing DNS?
If you’ve migrated your website to a new hosting server, you don’t have to immediately point your domain to the new server and hope everything works.
Using the Hosts file on Windows or macOS, you can test the migrated WordPress website using your real domain while your visitors continue seeing the existing live site.
Migrating a WordPress website to a new hosting provider is usually straightforward.
The part that makes me nervous, though, is the final DNS switch.
Once you point the domain to the new server, real visitors start hitting that server. If you discover a broken form, missing image, plugin conflict, incorrect redirect, or some other issue afterward, you’re fixing problems on a live website.
So, is there a way to test the website on the new server before changing the public DNS?
Yes!
What we’re trying to achieve
Imagine your WordPress website is currently hosted on Server A.
You’ve migrated a copy to Server B, but your domain still points to Server A.
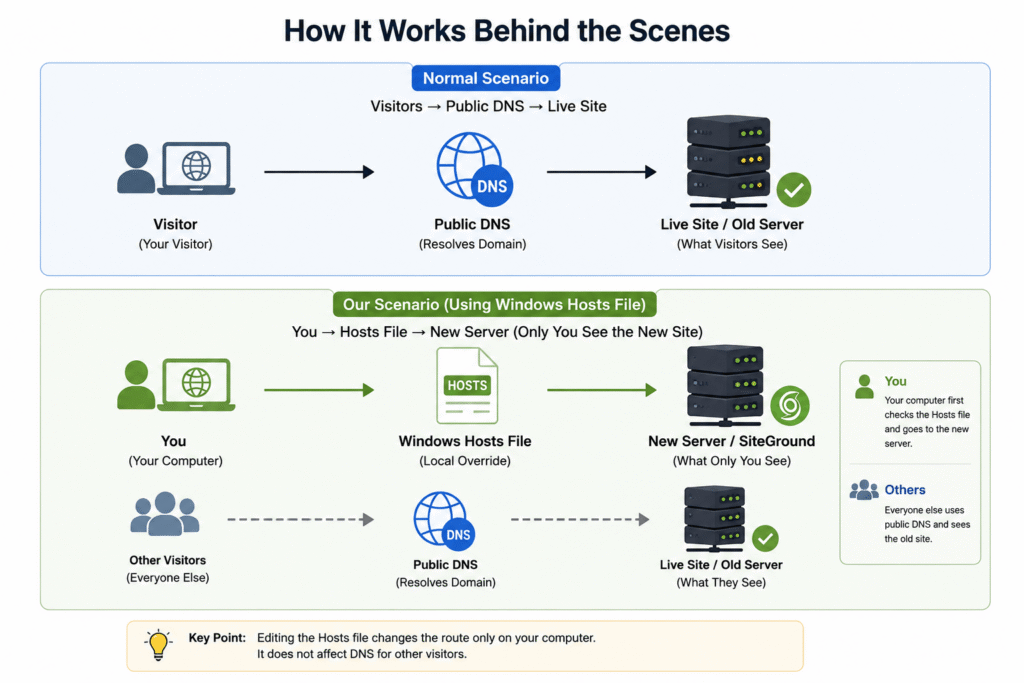
Normally:
Visitors → Public DNS → Server A
You don’t want to change the DNS yet because you haven’t finished testing Server B.
Instead, you can tell your own computer:
“When I visit this domain, use Server B instead of whatever the public DNS says.”
Your computer will then work like this:
Your computer → Hosts file → Server B
Meanwhile, everyone else continues using:
Visitors → Public DNS → Server A
That’s what makes this method so useful.
One of the simplest methods is to use your computer’s Hosts file.
This lets your computer open the domain from the new server while everyone else continues seeing the website on the old server.
What is the Hosts file?
The Hosts file is a local file on your computer that can manually map a domain name to an IP address.
For example:
123.123.123.123    example.com

123.123.123.123    www.example.com
This tells your computer that example.com should resolve to 123.123.123.123.
The important part is that this change is local to your computer.
You aren’t changing the domain’s actual DNS records.
You aren’t affecting other visitors.
You’re simply overriding DNS resolution on your own machine.
Let’s get started
Step 1: Get the new server’s IP address
Before editing anything, you need the IP address of your new hosting server.
For example, let’s say your new SiteGround server has this IP:
123.123.123.123
Obviously, replace this with the actual IP assigned to your website.
Don’t copy the example IP above.
Step 2: Open the Hosts File
Now that you have the IP address of your new hosting server, you need to tell your computer to use that server when you visit your domain.
The process is slightly different on Windows and macOS.
Windows
On Windows, the Hosts file is located at:
C:\Windows\System32\drivers\etc\hostsThe easiest way to edit it is:
- Open the Start menu.
- Search for Notepad.
- Right-click Notepad and select Run as administrator.
- In Notepad, go to File → Open.
- Navigate to:
C:\Windows\System32\drivers\etc\- Change the file type from Text Documents (*.txt) to All Files.
- Select the hosts file and open it.
macOS
On macOS, the Hosts file is located at:
/etc/hostsYou can edit it directly from Terminal.
Open Terminal and run:
sudo nano /etc/hostsEnter your Mac password when prompted.
Step 3: Add Your Domain and New Server IP
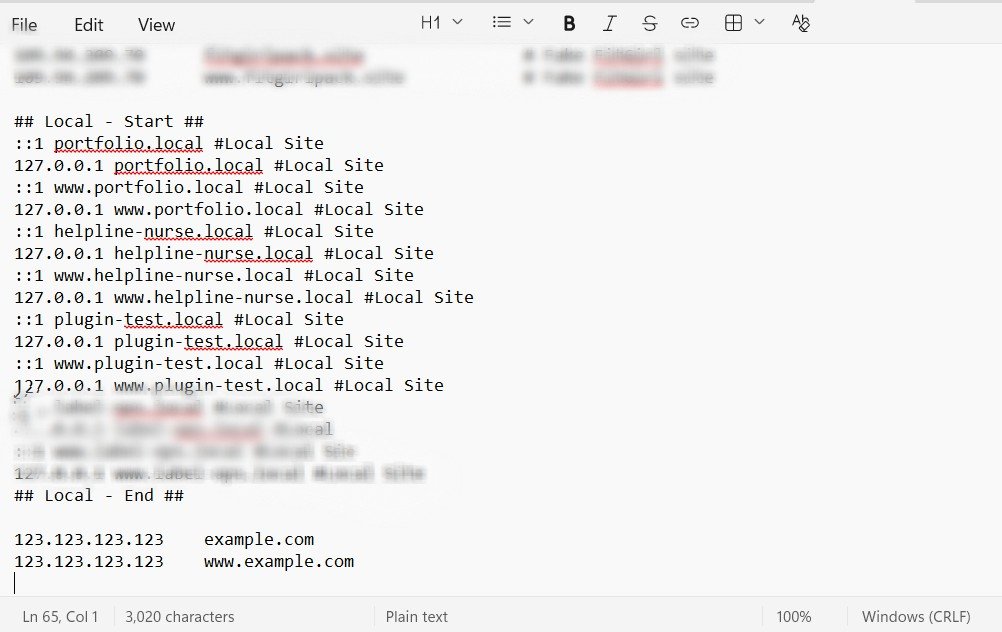
At the bottom of the Hosts file, add your domain and the IP address of your new server.
For example:
123.123.123.123    example.com

123.123.123.123    www.example.com
Replace 123.123.123.123 with your actual new server IP and example.com with your actual domain.
Windows
Simply add the entries at the bottom of the file and save it.
macOS
If you’re using nano, add the entries at the bottom:
123.123.123.123    example.com

123.123.123.123    www.example.com
Then:
- Press Ctrl + O to save.
- Press Enter to confirm.
- Press Ctrl + X to exit.
At this point, you have created a local DNS override on your computer.
Step 4: Flush the DNS Cache
Your computer may still have the previous DNS information cached, so it’s a good idea to clear the DNS cache.
Windows
Open Command Prompt as Administrator and run:
ipconfig /flushdnsYou should see a message confirming that the DNS Resolver Cache was successfully flushed.
macOS
Open Terminal and run:
sudo dscacheutil -flushcache

sudo killall -HUP mDNSResponder
You may not see any confirmation message. That’s normal.
After doing this, close and reopen your browser.
Step 5: Visit Your Website
Now open your normal domain in your browser:
https://example.com
If everything is configured correctly, your computer should now load the website from the new server.
This is the important part:
You are still using your real domain name.
You haven’t created a temporary domain or changed the public DNS.
Your computer is simply being told to resolve that domain to the new server.
Step 6: Verify That You’re Actually Seeing the New Server
Before you start testing the website, make sure your computer is actually reaching the new server.
One simple way is to run:
ping example.comThe IP address returned should match the IP address of your new server.
You can also make a temporary, obvious change to the new website—for example, adding a small “New Server Test” message somewhere only you can see.
If you can see that change through your normal domain, you know you’re testing the new server.
Remember to remove the temporary test afterward.
Step 7: Test the WordPress Website
Now comes the important part.
Don’t just open the homepage and assume the migration worked.
Go through the website as if you were a normal visitor.
Frontend
Check:
- Homepage
- Main navigation
- Internal pages
- Blog posts
- Categories
- Search
- Images
- Videos
- Downloads
- Footer links
- Mobile responsiveness
WordPress Admin
Log into:
https://example.com/wp-admin
Then check:
- Dashboard
- Posts
- Pages
- Media Library
- Plugins
- Themes
- Users
- Custom Post Types
- Custom Fields
- WordPress settings
Forms and Emails
Submit your contact forms and make sure the emails are actually delivered.
If the website uses SMTP, test that as well.
WooCommerce
If the website is an online store, pay particular attention to:
- Product pages
- Categories
- Cart
- Checkout
- Coupons
- Payment gateway
- Shipping
- Taxes
- Order emails
- Customer emails
- My Account
- Order history
A website can look perfectly fine while something important in checkout or email delivery is broken.
Step 8: Check SSL and Redirects
Make sure the new server works correctly with HTTPS:
https://example.com
Check for:
- SSL certificate errors
- HTTP → HTTPS redirects
- www → non-www redirects
- Non-www → www redirects
- Broken internal redirects
- Mixed-content warnings
Also check your WordPress URLs under:
Settings → General
Make sure the WordPress Address and Site Address are correct.
For example:
https://example.com
Don’t change these values unnecessarily just because you’re testing the new server.
Step 9: Check CDN and Caching
If the website uses Cloudflare, a CDN, or a caching plugin, pay extra attention during testing.
Caching can sometimes make you think you’re seeing the new version when you’re actually seeing an older cached version.
If something looks wrong, try:
- A private/incognito browser window
- Clearing browser cache
- Clearing the WordPress cache
- Clearing the CDN cache if appropriate
Step 10: Remove the Hosts File Entries
Once you’ve finished testing and you’re confident that the new server is ready, remove the temporary entries you added to the Hosts file.
For example, remove:
123.123.123.123    example.com

123.123.123.123    www.example.com
This step is important.
If you leave the entries there, your computer will continue going directly to the new server even after you change the public DNS.
That can make future troubleshooting confusing because your computer may behave differently from everyone else’s.